Bank Holiday Burgman DIY Weekend

A whole section dedicated to the Suzuki Burgman
User avatar
halfabusa
Benefactor
Posts: 1339
Joined: Thu Mar 26, 2009 10:17 am
Current Ride: Honda NC750X DCT
Location: Welling, Kent

Bank Holiday Burgman DIY Weekend

Post by halfabusa »

Hi fellow muppets! Today has been a greasy DIY day for me and the fellow muppet Data. He generously offered his day and his skills to teach me a lot more about working on my burgman 400 while his equally kind and hospitable wife offered endless run of coffee/tea to keep us going together with a delicious home baked date and apple crumble.

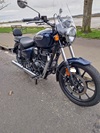
Background: My bike is a 2011 Burgman 400 with 8876 miles on the clock

So i beamed myself up to sunny colchester and met Data early on a sunny Sunday morning.

We started off by taking the left side lower panels off and first came out a very dirty and clogged up cvt filter.

Image

Image

While that came out to be hoovered and washed with a bit of fairy liquid, and left under the sun to dry out, we focused our attention on the belt and transmission casing.

The variator with the filter taken out

Image

It's going to look worse before it gets any better :D
Image

Casing ready to be taken off.
Image

A few useful tips here from Data:
1- We cut the plastic hooks that held the speedo cable in place and drilled little holes through the material to be zip tied back into place once we were ready to put everything back into place.
2- We labelled all the bolts (there are 10 of them in varying sizes) before taking them off so we wouldn't spend ages trying to find which one fits where.

Image

Trick here is to use a couple of bolts that fits to the holes in the middle of the casing which are long enough to go all the way back to the clutch. To take the casing off, all you do is to slowly turn the bolts into the casing and make them push the casing outwards. However, attention is needed here to lift the casing evenly all around, so we used a bit of help from a rubber mallet and some flat screwdrivers.


Cover off:

Image

Belt looking fine for an almost 9k bike!

Image

Data's homemade clutch bell tool to support the bell and keep it from turning while we took the 24mm bolt off on the middle

Image

Clutch bell off

Image

Quite a bit of dust built up in the bell

Image

So off the bell went to be cleaned off properly, after which we turned our attention on de-glazing the clutch pads

Image

80 grit sandpaper applied gently but firmly in the direction of the turn. Importance here is to keep the surface of the pads as smooth and level as possible, as well as paying attention to their corners.

Image

Transmission oil was next to change. Here's the inlet. We used a turkey baster to fill it.

Image

And here's the outlet to drain it

Image


We then wax oiled, greased, parafinned, hammerited, fs365'ed various things to clean and oil up, before fitting everything back into place. This area of work is a bit misty in my memory, possibly by all the fumes from those chemicals, but also partly because Data seems to have a huge arsenal of chemicals in his garage which would take me a few more times of doing this work to memorize all. :lol:

I also changed the spark plug with a Brisk premium one. Quick note here: The plug comes with a metal part screwed in to the side that the cap is supposed to fit, which i didn't notice before, so i had to take the plug out and unscrew the metal part which turned out to be a very tough part to take off.

We then attacked the air filter. The last time the air filter was changed was at 5175 miles, which was only 3700 miles ago, so i wasn't expecting a very bad state to be honest. However, running the bike in London jungle and using blackwall tunnel frequently, coupled with never been cleaned cvt filter (oops) must have taken a cumulative effect to end up in this:

Image

Yep! that is only a 3700 miles old air filter. So ladies and gentlemen, whatever you do, clean your cvt filter every 1800 miles religiously!

Old filter and the fresh new one

Image

Data also spotted some water that got into the airbox strangely. At first we couldn't figure out why this would have happened, but later on as i was down below the bike, i noticed something and it dawned on me!

Top Muppet tip: If you are anything like me and hate the muck and dirt building up on the bottom of the bike in the area above the rear tyre and attack it with a pressure washer, DONT! :D

I noticed that airbox was sitting right behind that which must have had the water coming in due to high pressure water pushed from the jet.

We also checked the brake pads and engine oil, and tightened the rear suspension two levels up from 3 to 5.


My god! What a difference all this work made!!!

The bike immediately felt so smooth and i can now feel no clutch pickup as it smoothly engages from starting up. Engine is much more responsive now and feels easier to rev. Mid range acceleration feels less restricted too, especially helps overtaking other vehicles.

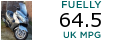
Coming to Data's starship headquarters in the morning, i left home with computer having averaged 14.5 miles/L commuting into london previous week and after a steady 75mph over 65 or so miles i noticed it had dropped to 14.2 miles/L.

So i was expecting things would have improved on the way back...

Going back home, Data kindly led me to a nearby petrol station where i filled up and reset the computer, then went back home on a steady 75 mph...

And instantly i knew there was a problem, i was expecting things to improve but i wasn't expecting miracles! The reading slowly started going up from 14...15...16... all the way on to 16.4 miles/L :D :D :D

It was shocking to see such a difference. Not only the bike was more responsive and less restricted, it became much more economical too.

The change on the suspension also transformed it's handling. My biggest gripe with the burgman 400 coming from a tmax was its handling. It used to bounce up and down and act wallowy on any uneven surface while i was leaning and turning, which led me to have a wider angle of turn than i used to have on the tmax, and turn slower too. Only 2 notches of stiffening has made the burgman's rear so stable now, it feels as if i'm going on rails! On the first roundabout i tried, i was expecting to have to slow down but the bike already was in the turn and begging me to speed up, as if saying "Right, turn sorted, what now, give me some more angle damnit!"

I'll continue to observe the handling and engine over the coming weeks and keep collecting my fuel economy information on fuelly, but i can say it has been a very useful and enjoyable day for me.

Again, many thanks to Mr and Mrs Data for their time and kindness! I am enjoying the Burgman much more now!
ImageImageImageImage

NC750X DCT
FJR1300
Burgman 400 gone
Tmax 500 Sold
Burgman 650 dead...

Liam
Benefactor
Posts: 1275
Joined: Thu Aug 06, 2009 1:22 am
Current Ride: Tmax 560 Vespa Sei Giorni
Location: South Normanton. The crap bit of lovely Derbyshire

Re: Bank Holiday Burgman DIY Weekend

Post by Liam »

Good info and nice and clear photos! Very helpful to Burger owners and interesting to the rest of us!
Well done Halfa and well done Data!
I think I'll make myself a tool like that tomorrow. I need to sort my variator weights very soon.

Someone has dirtier air filters than me!! :o
:lol:

Dave Weller
Benefactor
Posts: 1736
Joined: Mon Apr 13, 2009 10:25 pm
Current Ride: VespaGTS250 Wave110i

Re: Bank Holiday Burgman DIY Weekend

Post by Dave Weller »

Jolly good write up, thanks, did you change the air filter last time or pay someone to do it?
Honda NC750 Manual
VESPA GTS250
Royal Enfield HNTR 350
Honda Wave 110i

User avatar
halfabusa
Benefactor
Posts: 1339
Joined: Thu Mar 26, 2009 10:17 am
Current Ride: Honda NC750X DCT
Location: Welling, Kent

Re: Bank Holiday Burgman DIY Weekend

Post by halfabusa »

They changed it at Aye Gee last time it went in due to the wire issue in the spark plug cable. They also said it looked filthy and that they had to change it.

Mind you, they didn't seem to have put the airbox back into place properly as we noticed today that one of the plugs that hold it in place was completely out loose.

This was back in March by the way.
ImageImageImageImage

NC750X DCT
FJR1300
Burgman 400 gone
Tmax 500 Sold
Burgman 650 dead...

User avatar
Data
Benefactor
Posts: 3312
Joined: Wed Feb 08, 2012 12:43 pm
Current Ride: Royal Enfield 350 Meteor
Location: Starfleet Command, North Essex Branch, UK

Re: Bank Holiday Burgman DIY Weekend

Post by Data »

Mr AND Mrs Data here (Smokey's out hunting frogs at the mo!)! Glad you like the improvements to your bike Halfabusa. You may find your headlights need just a little tweak upwards as the darker nights arrive now that your bike is sitting just a little higher at the backend. It's easy and no dismantling is needed just in case you are not sure on the adjusting side of things. Let me know if you need any pointers for the lights. That's bloody brilliant regarding the fuel economy, but not surprising considering the state of the air filter. As you say that's a lesson for us all. Check those filters guys and girls! I wonder how much difference is down to the new Brisk spark plug. I'm very interested to hear your continuing thoughts on that one in the coming weeks. Your photo's came out well showing pretty good detail considering we were half cut on the fumes from my arsenal of chemicals. :lol: It got no better when I popped back inside and went upstairs. Mrs Data was putting nail polish on her toe nails and her arsenal of chemicals is bigger than mine!! :o

Anyhoo...we are glad you had a good day here at Starship headquarters and enjoyed your Starfleet cake!

Great to see you mate. Bye for now.

Mr & Mrs Data
Probably not ugly enough for the 'Ugly Bunch'! :lol:

Been riding for 55 years & owned too many bikes to list here...

VOZZA
Benefactor
Posts: 1481
Joined: Tue Apr 14, 2009 11:03 pm
Current Ride: Forza 125
Location: 15 miles north of Swansea

Re: Bank Holiday Burgman DIY Weekend

Post by VOZZA »

Excellent report with great photos, thanks to the collaboration of fellow Muppets a good guide for Burgman owners.
Hell it's so good I might even get myself a 400 Burger when the next change is due. icon_wink-.gif Wales.gif
Pete

Vespa GTS300 Super for practical runabout, Triumph Tiger Explorer for conquering the planet. Car almost obsolete.

User avatar
halfabusa
Benefactor
Posts: 1339
Joined: Thu Mar 26, 2009 10:17 am
Current Ride: Honda NC750X DCT
Location: Welling, Kent

Re: Bank Holiday Burgman DIY Weekend

Post by halfabusa »

We were actually half way to hatching a plan today about having a bigger meet with some other muppets one day and make a DIY maintenance BBQ day :) (hell of a mix!)
ImageImageImageImage

NC750X DCT
FJR1300
Burgman 400 gone
Tmax 500 Sold
Burgman 650 dead...

User avatar
halfabusa
Benefactor
Posts: 1339
Joined: Thu Mar 26, 2009 10:17 am
Current Ride: Honda NC750X DCT
Location: Welling, Kent

Re: Bank Holiday Burgman DIY Weekend

Post by halfabusa »

I'll take a look at adjusting the headlights when the days get darker Data. I forgot to mention about Smokey on my post so i hope he forgives me. He's a such a big character and a clever cat! The way he played with that frog was a very funny sight (no harm done people, chill out, Smokey doesn't like their taste :))
ImageImageImageImage

NC750X DCT
FJR1300
Burgman 400 gone
Tmax 500 Sold
Burgman 650 dead...

Bluebottle
Benefactor
Posts: 3184
Joined: Fri Jan 08, 2010 2:50 pm
Current Ride: Burgman 400 ZA L0
Location: Manchester UK

Re: Bank Holiday Burgman DIY Weekend

Post by Bluebottle »

Hmm...lots of chemicals, barbecue - what could possibly go wrong :)
If you want you can borrow mine for demonstrations of you want, it's a sacrifice I'm prepared to make.
WE ARE THE BURG resistance is futile
The Ugly Bunch-1

luandablue
Posts: 75
Joined: Thu Mar 31, 2011 1:14 pm
Current Ride: Honda PCX
Location: Stockport

Re: Bank Holiday Burgman DIY Weekend

Post by luandablue »

Great post. Very impressive work, both. (And Mrs D of course)

Post Reply